What is a “binder”?
A binder in the context of this class is a GitHub repository that contains a notebook you’d like others to be able to interact with and run, plus the configuration files that Binder needs to create an environment for your code to run in.
On myBinder.org, you just paste the url to the repository that has your notebook in it to create an interactive binder, but more on that later.
Preparing your repository
So you’ve created a notebook on your computer, and it works! Yay! Currently, it’s likely just in a directory on your comupter, the only other thing there aside from the notebook is the data your notebook is working with. You could push this to GitHub now, and those who want to use it could do so through cloning your repository and running it locally; but, by adding just one more file, you can make your notebook interactive to others online via Binder!
A Python Notebook
If your notebook uses Python, creating an interactive binder very quick– Jupyter notebooks are by default built using the Python kernel. All you have to do is export the conda environment you built your notebook in! Open the command line and, after making sure the conda environment you built your notebook in is activated, navigate to the directory your notebook is in and enter:
conda env export --from-history -f environment.yml
environment.yml contains some basic info on your environment, but most importantly, the python version and all of the modules your notebook depends on to work!
.yml is a human-readable configuration file written in YAML, a “data serialization” language (like JSON). This means that you could actually write the environment.yml yourself (it’s just a bit more effort). For an example of this, check out the example repository provided by Binder!Your directory should now have the following files in it:
- Your notebook(s)
- Your data (if needed)
environment.yml
Now add this all to a repository on GitHub.
A R Notebook
Getting a notebook that uses R running live on myBinder is slightly more work than it is for Python, because you can’t just export your conda environment (which is based in Python); fortunately, you can also easily write a configuration file for your notebook! Firstly, make a new file in the same directory as your notebook, and save it as environment.yml. Now, in terms of writing your environment.yml, the file should be set up like so:
# "channels" tells Binder where you're downloading your packages from (so the "channel" it should be watching)
# "dependencies" lists all the packages your notebook depends on to run

channels:
  - conda-forge # we can download most popular R packages from conda-forge
dependencies:
  - r-base # this tells the notebook that you're running R instead of Python, so it must ALWAYS be included
  - r-tidyverse
Although most R packages in conda-forge follow the naming scheme of “r-[the R package]", you may want to verify that it’s available by quickly searching the conda-forge list of packages. If everything you need is there, then you’re good to go! If a package you need isn’t listed, then you’ll have to also add a postBuild script.
A postBuild script is something that Binder will run after it sets everything up using your environment.yml, and it contains a sequence of commands like the ones that you type in the command line! It allows you to install packages via devtools (aka packages pulled from GitHub) instead of through conda-forge, something that you cannot do in the environment.yml.
To create a postBuild script, make a new file in the same folder as your environment.yml and notebook, and save it as postBuild– there is NO file extension! In this file, you’ll include commands written like so to install the extra packages you need:
R --quiet -e "devtools::install_github('[the GitHub repository of the package]')"
For an example of a repository that uses both an environment.yml and postBuild, check out this R notebook that was created for this course, on topic modelling and visualisation.
To sum, your directory should now have the following files in it:
- Your notebook(s)
- Your data (if needed)
environment.ymlpostBuild(if needed)
Now add this all to a repository on GitHub.
Launch on myBinder
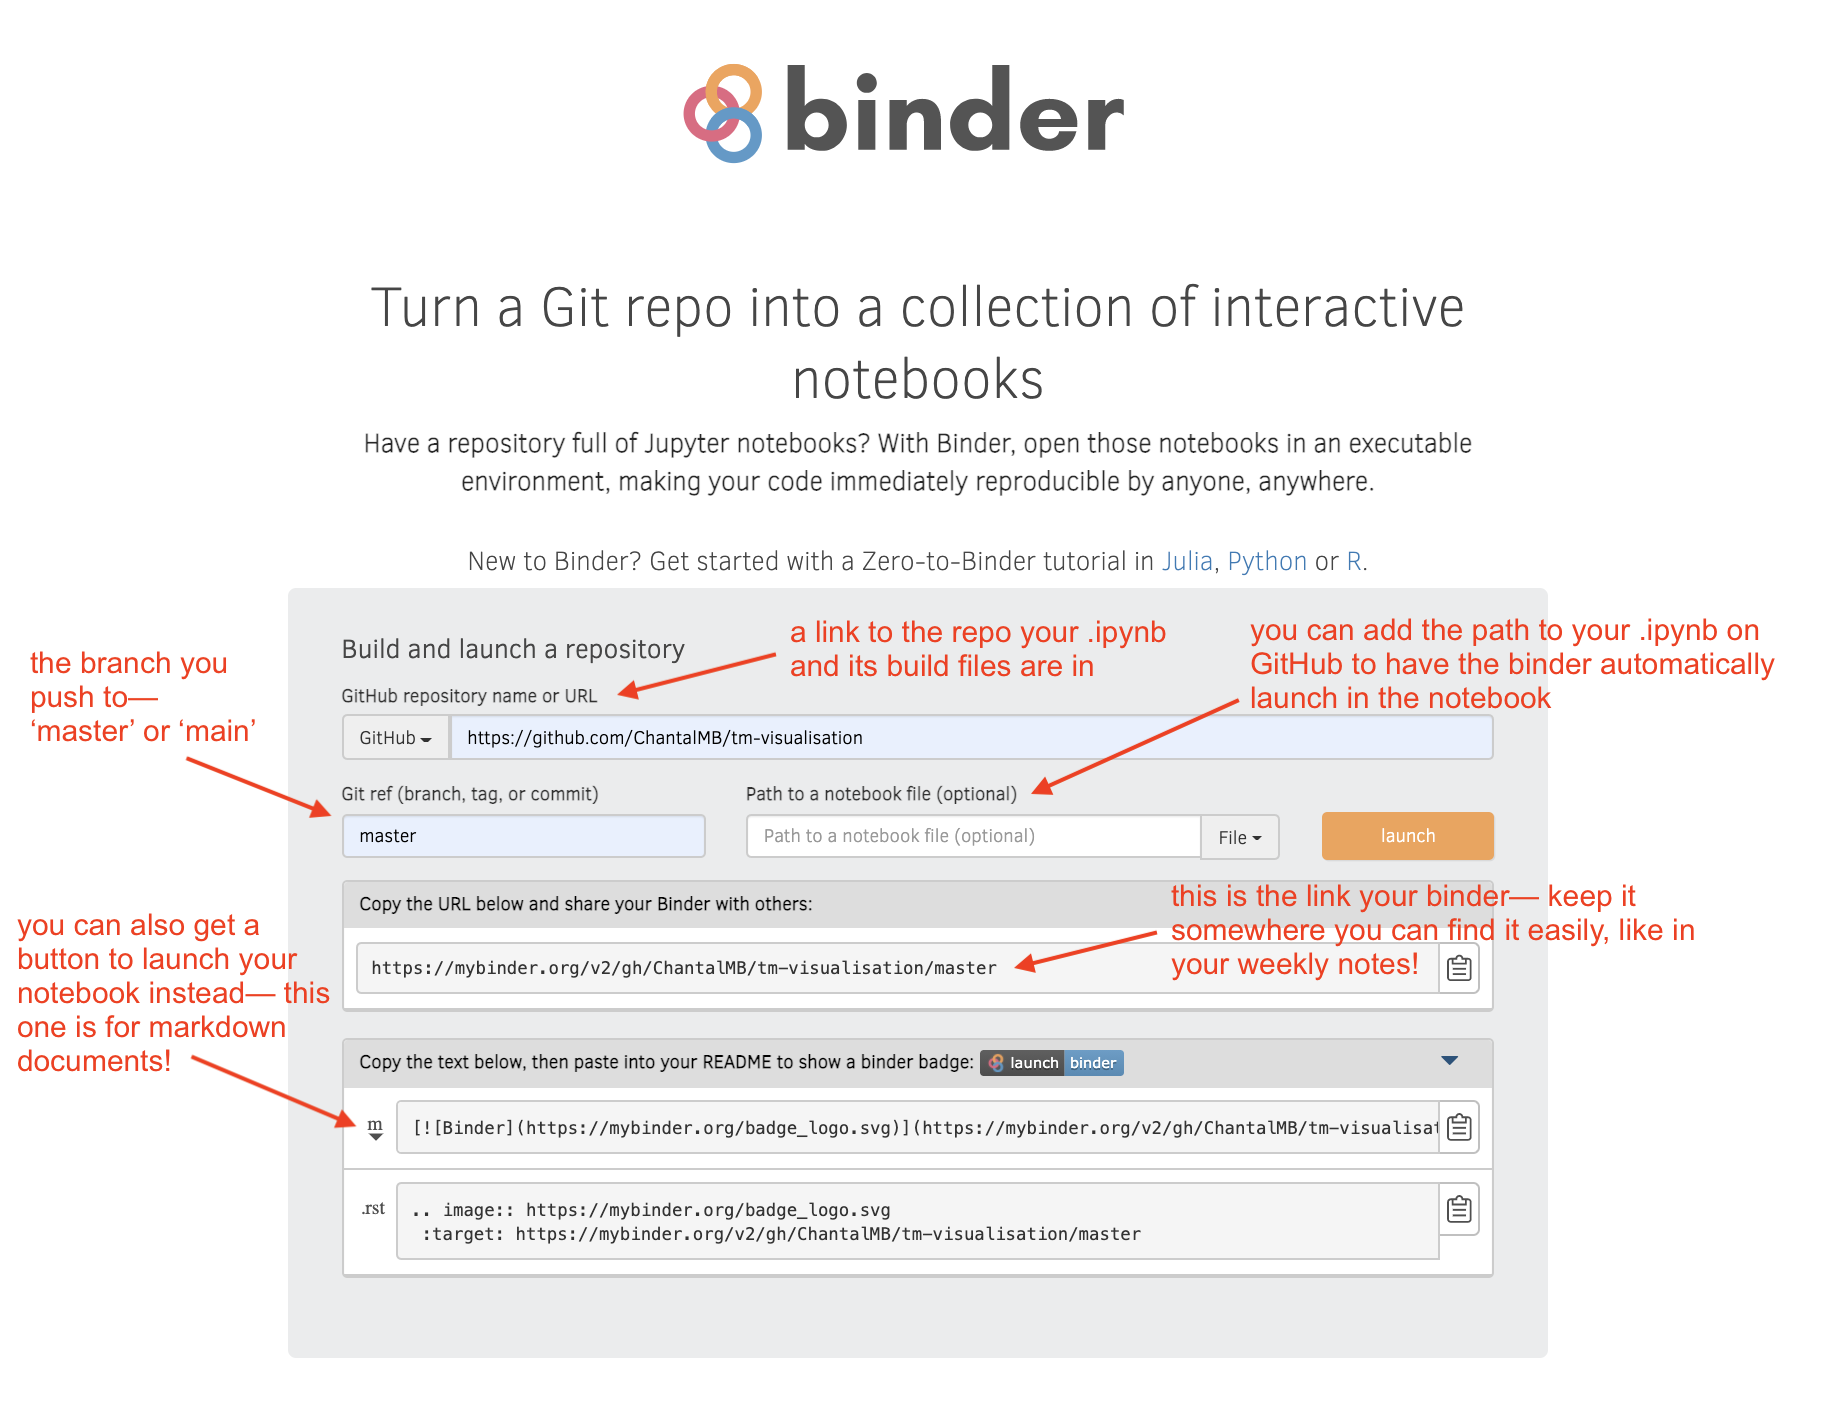
So now let’s make your notebook interactive, online (like the ones we’ve been using in this class)! Navigate to myBinder.org, and you’ll see that what to do is pretty self-explantory, but here’s a quick rundown of the myBinder process anyway:
Warning: the first time you build a notebook using myBinder, it can take a LONG time! The example notebook I referenced for R took somewhere between 30mins and 1hr to build with all its various packages– I’m not sure the exact time because after 30mins I decided to stop waiting around and play with my cat. Use your binder’s build time to take a break too! And if anything goes wrong, don’t forget to snap a screenshot and ask for help in the Discord server!