Simple Versioning with Git & Github
Git is a program you can put on your computer to take periodic ‘snapshots’ or commits of the contents of your folder. Each snapshot gets a descriptive message about why you’ve taken that snapshot. Git can also let you create ‘branches’ for your work from a given point. You might want to do an experiment; a branch is a copy of your folder that you can work on and, if the experiment doesn’t work, you may discard that branch and everything goes back to normal. Alternatively, if you like the results, you can merge the results into your main branch and move forwards.
A neat outcome of all this is that you can share your files and your sequence of commits with other people; they can work on a version of your files on their own branch, and then ask you to pull their changes into your main folder (or repository) if you like what they’ve done. We use Github to achieve that.
Things can get very complicated, but at its simplest, there are only four commands you’d need to learn in order to use Git on your computer to keep your historical research under version control. No more ‘essay.txt’, ‘essay-final.txt’ ‘essay-final-i-mean-it.txt’ files littering your machine. And of course, when you’re doing digital work or writing Jupyter notebooks and so on, you really do want to keep things tidy.
Get Git
Windows:
If you have a PC, click on this link to download and install git. Just use all of the suggested default settings when you run the installer.
MacOS:
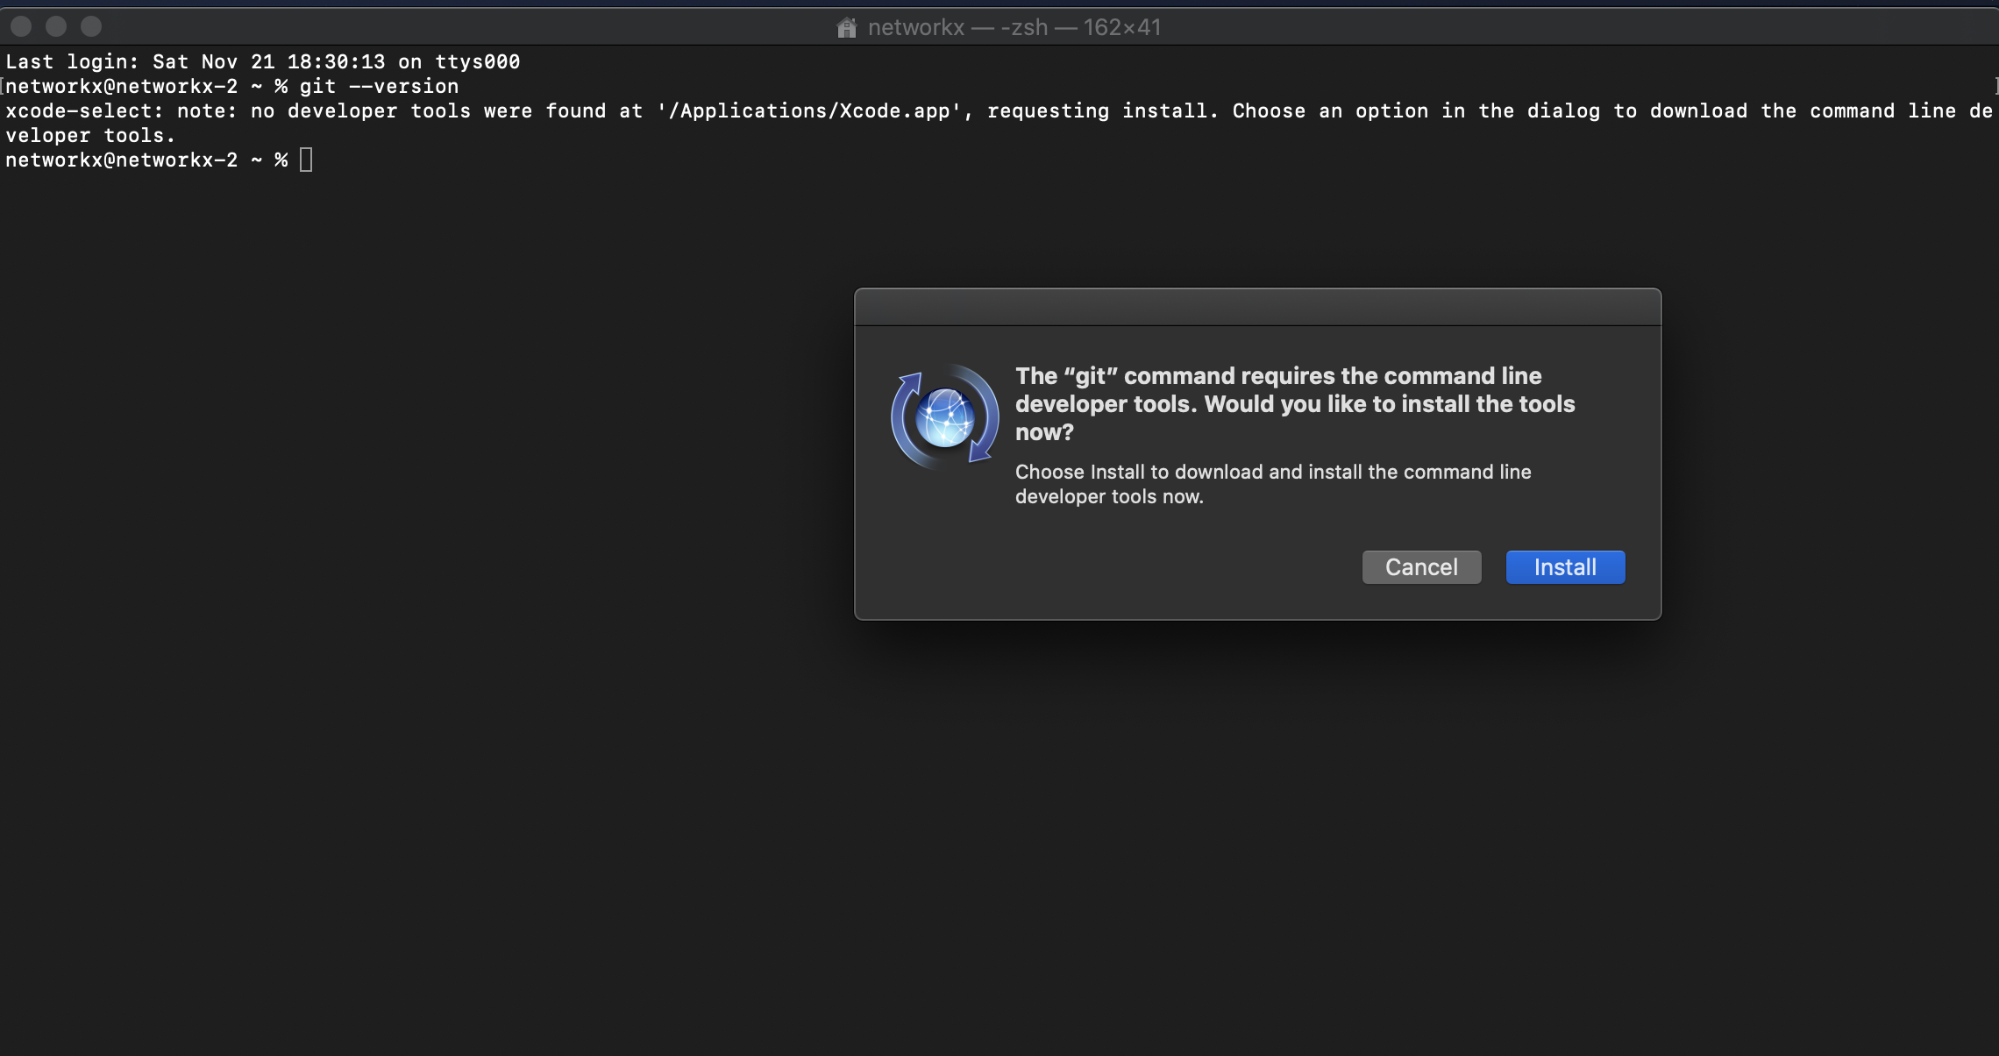
The easiest way to install git in macOS is by simply opening the command line and entering the command git --version. You will then be prompted by a pop-up to install it, assuming you don’t already have git installed:
If that doesn’t work you can also install it via Homebrew. If you never installed Homebrew during the introduction to the command line, check out Step 3 in the written tutorial.
Once you have Homebrew, all you have to do to install git is run:
brew install git
Tutorial Setup
- Make a new directory on your computer. Make a few text files and save them in that directory. We’ll run our demonstration here.
- On a PC, find the folder in your file explorer; click on it so that’s the folder displayed in the address bar at the top of the explorer. Then, click in the address bar and type
cmdand hit enter. This will open a command prompt window for that folder, allowing you to type commands in directly. On a Mac, go to System Preferences, select Keyboard > Shortcuts > Services. Look for ‘New Terminal at Folder’ and tick the box. Open your finder; find the folder you created, right-click and select ‘open Terminal here’.
A Quick Primer for Working at the Command Line or Terminal
The following two videos, one for PC, one for Mac, show you how to do this. For reference’s sake, this is what ‘working at the command prompt’ or ‘working at the terminal’ look like on your machine. When you interact with your computer, you can do it through a graphical interface - icons, clicks, etc - or you can directly type in commands. It’s this latter kind of interaction that most people think of as ‘coding’, but for us, this is just ‘opening the hood’.
PC:
Mac:
Key commands for PC:
dirshow the contents of the current directoryclsclear the window so that it’s fresh againcd directory-namechange director to the named directorycd ..change directory up one level- if you hit the up or down arrows you can cycle through the history of commands you’ve already typed
Key commands for Mac:
lslist the contents of the current directorypwdprint the path (location) of the current directorycd directory-namechange director to the named directorycd ..change directory up one levelhistoryprints out the entire history of commands you’ve typed this session- up and down arrows will cycle through this list
Setting up your repository
-
Now we’ll tell Git to watch the folder. At the command prompt, type
git init. This creates a hidden folder inside your directory called.gitand inside that folder it will keep the data about your snapshots. -
Make some changes to your text files, save some new ones, whatever.
-
Back at the command line, type
git status. This will tell you whether Git sees any new changes, and crucially, if you have changes that it know you haven’t taken a snapshot of yet. Let’s remedy that: -
You can update git’s record by adding things:
- Individually:
git add <filename> - All at once:
git add -A
- Individually:
-
If you ran
git statusnow, it’d tell you that you’ve staged some files. Now we take a snapshot and leave a message to ourselves:git commit -m "[your message goes in here]".
And there you go: you’ve got your files under version control! But you need to learn how to roll things back, and/or how to push your repository onto Github for safe keeping.
We’ll start with Github.
-
Go to Github.com, log in, and hit the big ‘+’ beside your avatar at top right and make a new repository. Do NOT tick off the ‘initialize this repository with a README’.
-
Let’s say I made a new repo called ‘demo5’. It’s URL would be
https://github.com/shawngraham/demo5. Take a note of the full URL for your repo. We need to now tell Git on your computer this location. So, in my case, back at the command line, the command would look like this:
git remote add origin https://github.com/shawngraham/demo5.git
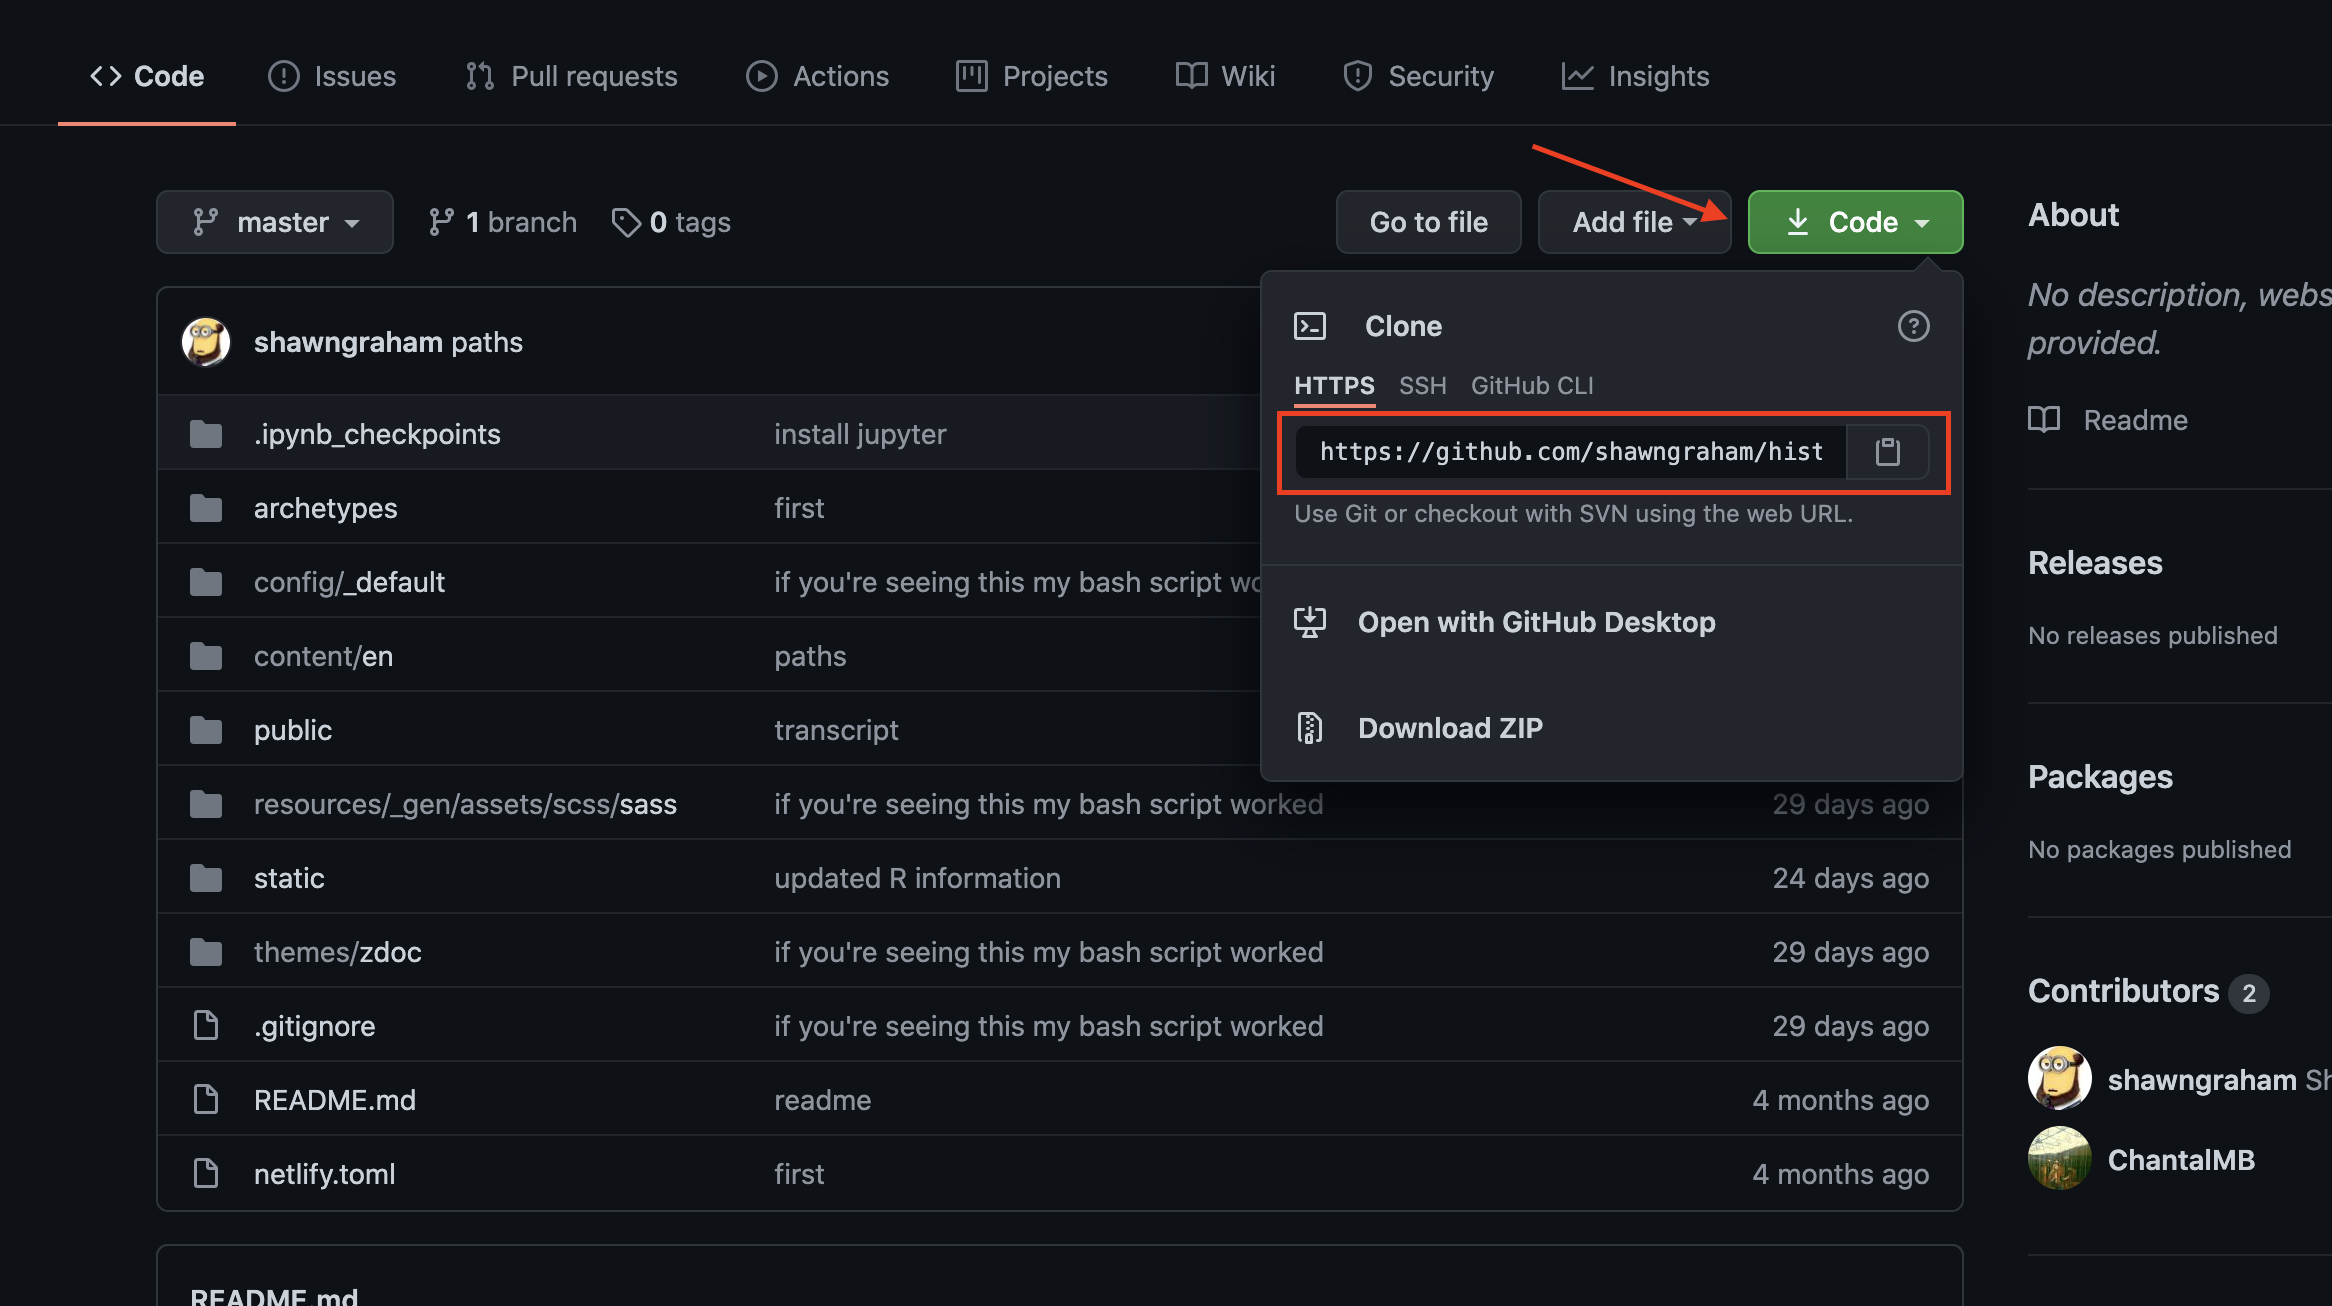
Note the .git at the end of the url! You can actually find this url in your repository here:
- Now that Git knows where to stash a copy of your materials, you can tell it to do so by
pushing the files from your machine to github:
git push -u origin master
Keeping your repo updated
As you know, the whole point of Git and GitHub is to keep track of the changes to your files, so of course you need to keep your repository up-to-date when you make any changes! After setting up, this is nice and quick to do– after you finish your work for the day or are about to make a change you might need to revert, you can save your files in their current state like so:
git pull to make sure that your local repository is up-to-date and includes any changes that your partner might have made!-
git add -A -
git commit -m "a message" -
git push
Reverting Changes
So you made a change, something doesn’t go quite right, and you want your previous version back… to reset EVERYTHING, the command you’ll need is:
git reset --hard HEAD
For more specific circumstances, check out the guide located here.